Disclosure: This article may contain affiliate links. If you buy a product through an affiliate link, we may receive a commission at no cost to you.
With many fire pit grill options in the market, including the popular Solo Stove grill top, the BioLite FirePit+ may be the best for a fire pit BBQ. BioLite sent us a FirePit+ with the cook accessory set and we were impressed with its capabilities. It’s shape, air jets and accessories make it not only a great portable fire pit, but a great little grill.
We did a full review of the FirePit’s capabilities as a portable fire pit previously, in this review we’re focusing just on using it as a fire pit grill. If you’re looking at purchasing a BioLite FirePit+, click here to check the price on their website.
Summary
Pros
- It comes with a grill grate, so you don’t need to buy any accessories for high heat cooking
- The FirePit is a rectangular fire pit, so it’s easy to create an indirect heat setup
- The grill grate is attached on one side (cantilevered), so it’s easy to add more charcoal while cooking
- The FirePit+ is an electric fire pit with air jets, this makes it easier to light and feed air into your fire
- The grill lid and griddle accessories add even more versatility to cooking
Cons
- No thermometer in the grill lid
- The grill lid is easy to catch on the grill grate, so make sure to take it off slowly and straight up otherwise you could knock your food on the ground
- It can be hard to move the charcoal grate to the top position while cooking
Lump Charcoal vs. Charcoal Briquettes
Ahh the age old debate of lump charcoal vs. charcoal briquettes. For those not familiar, charcoal comes in 2 main types, the first is charcoal briquettes which are those traditional square shaped pieces of charcoal (think Kingsford). The other is lump charcoal, which is just burned-up pieces of wood, so it’s in all shapes and sizes. Our preference for cooking is lump charcoal. While there are great options out there for natural briquettes, we like that there is no additives in lump because it’s just burned wood.
While we used lump charcoal to test the FirePit, if you’re new to grilling, you may find briquettes to be easier. They’re uniform in shape and size, so it’s easier to regulate temperatures. One other thing that’s easier with briquettes is they won’t fall through the grill grates, like small pieces of lump charcoal do.
Lighting Your Charcoal
You never want to use lighter fluid or any type of chemicals in your FirePit, BioLite specifically calls this out. If you’ve always used lighter fluid to start a grill, don’t worry, there are really easy ways to light charcoal. These work great in the FirePit and once you’ve tried them, you’ll never go back to lighter fluid again.
Charcoal Chimney
One easy way to light charcoal is with the use of a charcoal chimney. It’s a metal cylinder with holes in it that promote air flow. For the FirePit we’d recommend a small chimney like this one on Amazon, as you won’t be using a ton of charcoal.
To use the chimney it’s as simple as putting as much charcoal as you want in the top, then putting crumpled newspaper in the bottom. Put the chimney on a flameproof surface, light the newspaper and voila, you’ve got hot charcoals. It just takes a few minutes for the charcoal to catch and get a good burn going. Once they’re good and hot, carefully pour them in the FirePit.
Fire Starters
Another easy way to light the charcoal for the FirePit is with a natural fire starter, like this one on Amazon. Place it on the grate inside of the FirePit, then put a pile of charcoal around and over the fire starter. Leave enough space so air can get to it and so you can light it. Then all you have to do is light the fire starter and once it’s lit, turn the fan on the FirePit to low and wait a little bit for the coals to catch and get hot. If you want to speed up the process, once you know the charcoal is lit, turn the fan speed up another notch to really get it going. Once the charcoal is hot you can carefully move it to where you want in the FirePit.
Hibachi-Style Grilling
The easiest way to cook on the FirePit is with a Hibachi-style grill setup. This is traditional campfire cooking, as you’d see with other fire pits on the market. It’s high heat cooking and you don’t need any accessories to do it, though the grill lid is helpful to retain heat.

Put the grate inside the FirePit on the higher position, then use one of the methods described above to start your charcoal. Spread the charcoal across the grate then wait a little bit for the grill temperature to heat up. All you have to do now is throw some food on the grill gates and cook it.
Indirect Heat Grilling
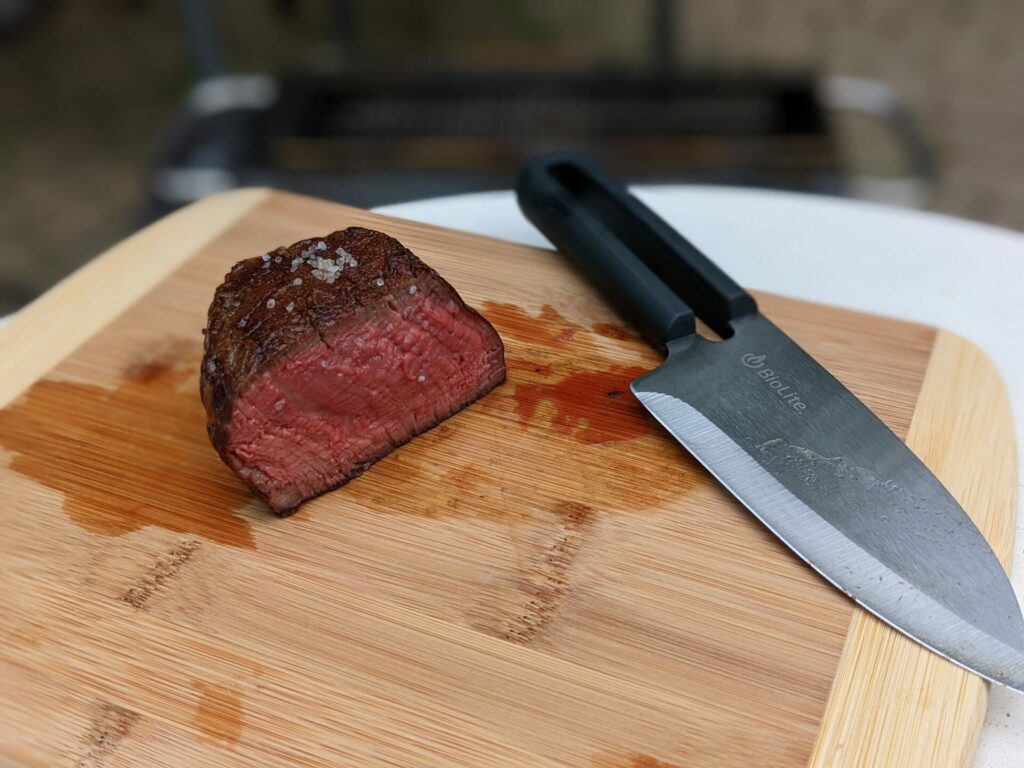
The ability to create a 2-zone setup for indirect heat cooking is what really sets the BioLite FirePit+ apart from other fire pits on the market for grilling. While indirect heat is used for most BBQ, one of our favorite things to cook with this method is reverse seared filets. That’s a fancy way of saying you heat the filet at a low temperature until it’s almost at temperature for desired doneness and then sear it with high heat. Cooking a filet like this gives you really tender meat that’s smoky with a nice crust.
FirePit Cook Accessory Set
Any cooking you’re doing on the FirePit is much easier with the FirePit Cook Accessory Set (click to go to the product page). While you can get by without it if you’re just planning on cooking with high heat, the included grill lid makes it easier. A grill lid is essential if you’re cooking with indirect or lower heat.
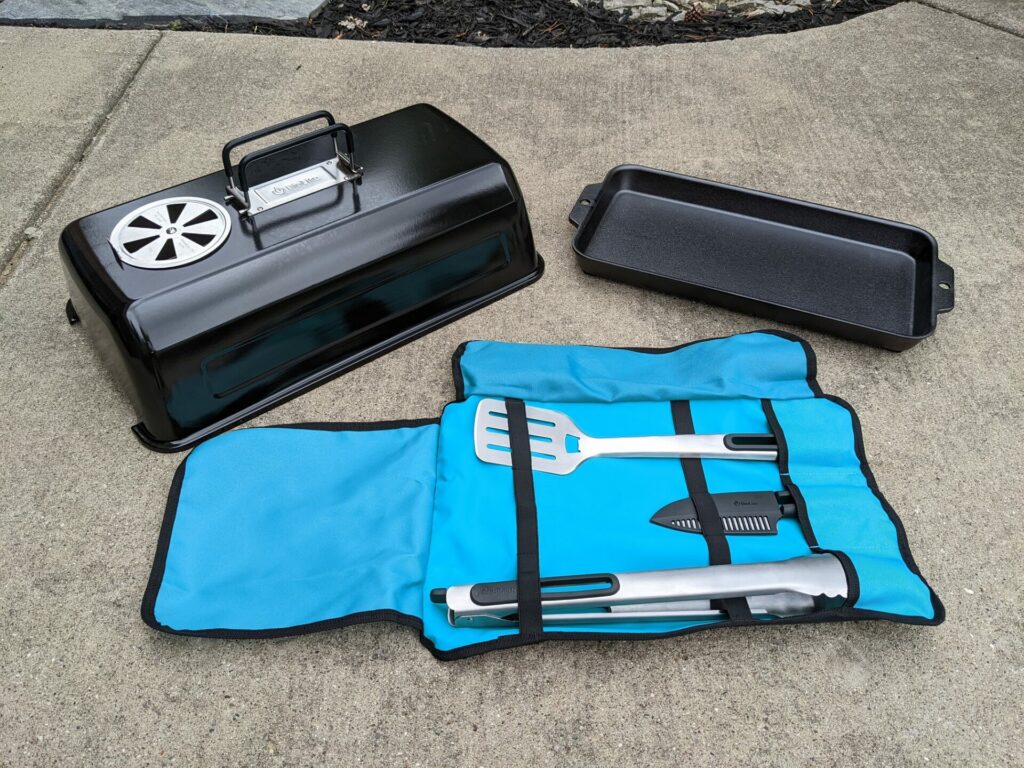
The included griddle is high quality and fits perfectly on the grill. With a griddle you can cook just about anything, breakfast lunch or dinner. It makes the FirePit much more versatile for cooking. It’s also great for searing.
The accessory set comes with some high quality tools. There’s a spatula, tongs and a rugged, sharp knife. It also comes with a carrying case which is nice for packing them up to take camping.
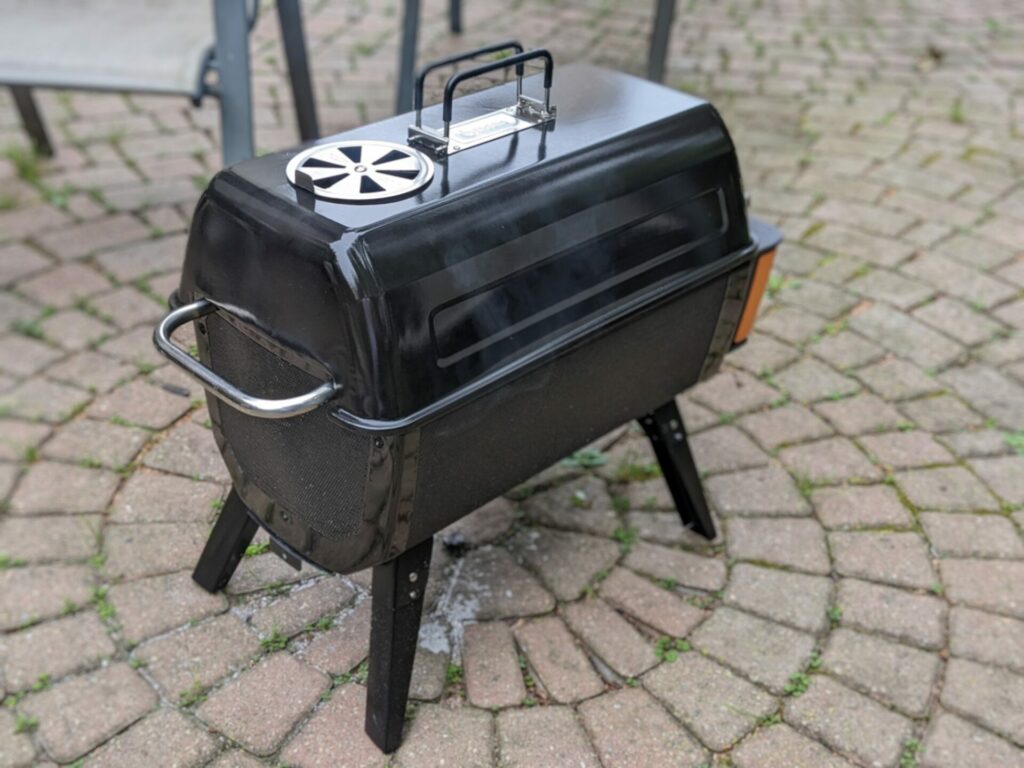
Charcoal Grate Position
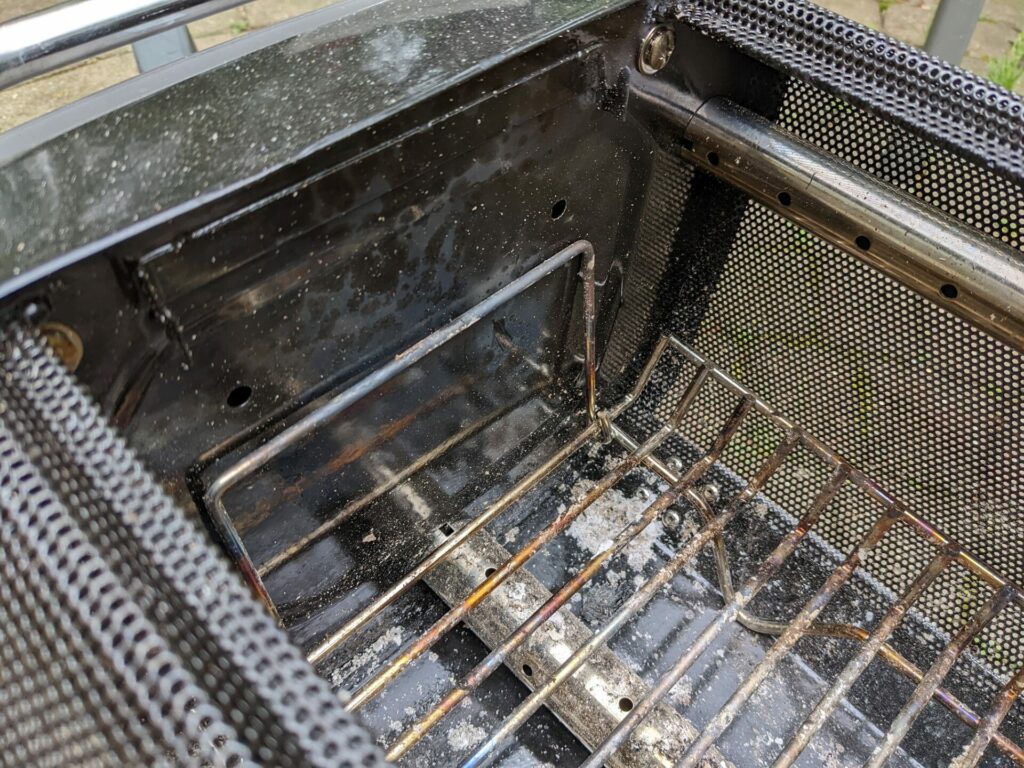
Unlike the high heat method of cooking, for indirect heat, put the charcoal grate to the bottom of the FirePit. If you plan on searing at the end of your cook, make sure the hinged part used to hang the grate is lifted up, as shown in the picture above. This will make it easier when you go to move it later because there won’t be lit charcoal on top of it.
Charcoal Placement
Using one of the methods listed above for starting your charcoal, arrange the charcoal in the FirePit on the side where the battery is. Don’t use too much charcoal, or the FirePit will be too hot. Getting a feel for the amount of charcoal you need takes a little bit of practice.
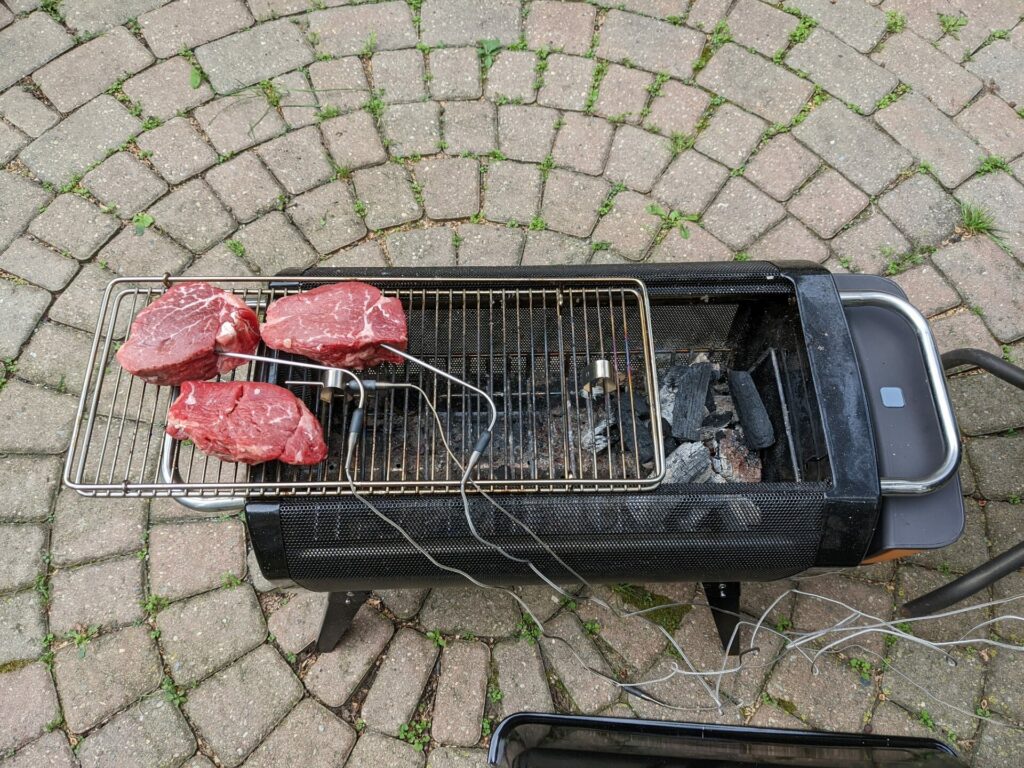
For cooking filets, I wanted to be between 225 degrees F and 250 degrees F. You can see in the photo above the amount of charcoal I used to get that amount of indirect heat.
I put the charcoal on that side of the FirePit for two reasons. One, the other side of the FirePit is mesh, so it wouldn’t reflect heat very well. Second, a great feature of this fire pit is that the grill grate slides open. That makes it really easy to add more fuel if you’re doing a longer cook or if you need to take charcoal out if it’s too hot.
Temperature Monitoring
With some practice, you can get by without temperature monitoring and still get good results. It would have been nice if the grill lid included a simple thermometer though. We used a ThermoWorks Signals to monitor air temperature and meat temperature. It’s a cool device with the ability to use 4 temperature probes that you can monitor on the controller or on your phone. While this seems like overkill on a fire pit grill setup, it really opens your possibilities for what you can cook and it makes it so you can be busy with other things and still monitor your cook.
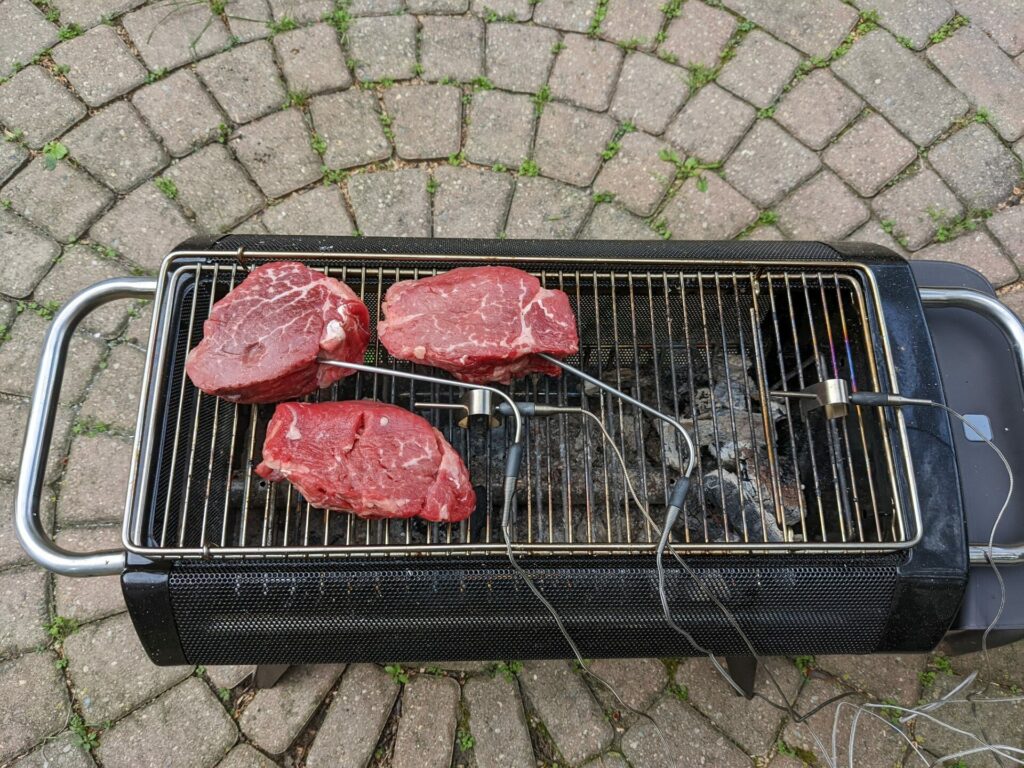
You can see in the picture above where we placed the air probes in the middle of the grill and used the other 2 to keep an eye on the meat. If you’re just cooking indirect, you don’t need the probe above the charcoal, we used it for testing. If you’re going for a 2-zone setup though, you’d want to use both probes. The left side would be for cooking at a low temperature, and the probe directly above the charcoal would be for cooking at a high temperature.
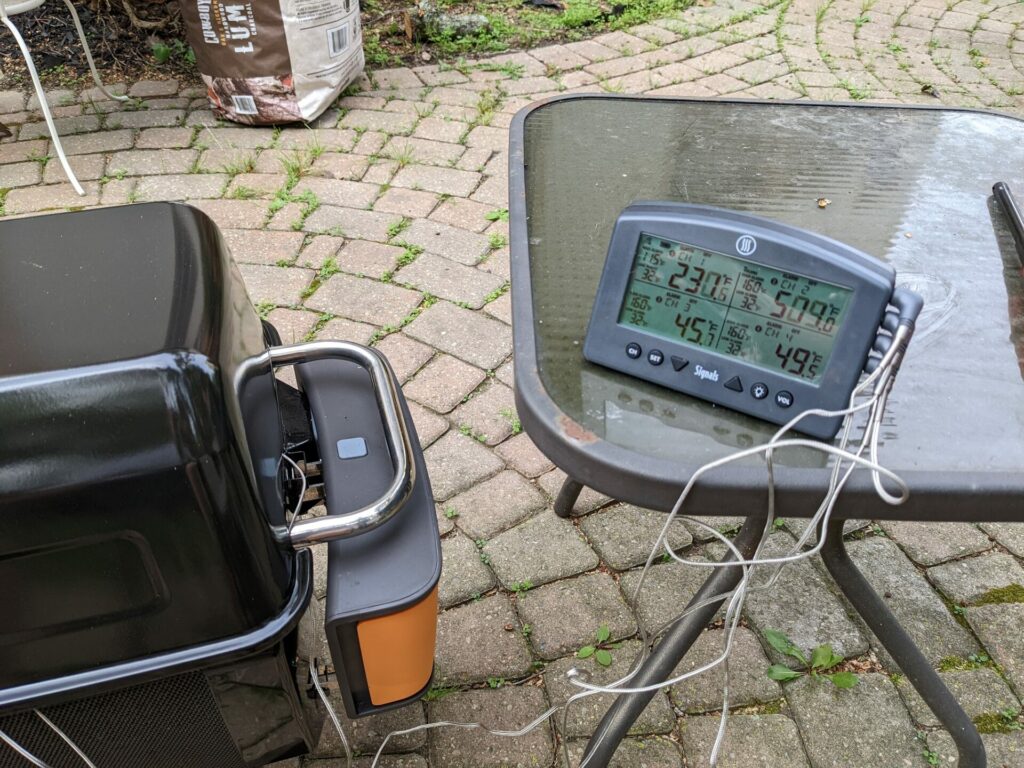
In the photo above you can see the controller with the 2-zone readings. Where the meat is (top left number), it’s at a low and slow temperature, while the other side is a few hundred degrees hotter (top right number). The bottom numbers are for the probes in the meat. You can see we just got started cooking here.
Air Jets
As we covered in our review of the BioLite FirePit+, this fire pit is innovative because it has 3 air jets that you can control. This is also helpful when you’re cooking. If you want your charcoal to heat up, turn the fan on or up a little and it will get roaring. Similarly, if you’re fire is too hot back it down. This was really helpful when adding in new charcoal to feed the fire, or because we wanted it to get hot to use the griddle.
Grill Lid Placement
You’ll notice on the BioLite website, they show using the grill lid with the vent on the same side as the battery pack. If you’re just cooking with hot and direct heat, that’s fine. Similar to an offset smoker, if you’re cooking indirect then make sure the vent is on the other side. This way the hot air flows from the charcoal pile across your food and out the vent.
It’s worth noting that the walls of the grill lid reflect heat, especially on the side right above the handle because it’s reflecting on multiple sides. This will make food all the way on that side cook faster then when it’s a little more towards the middle.
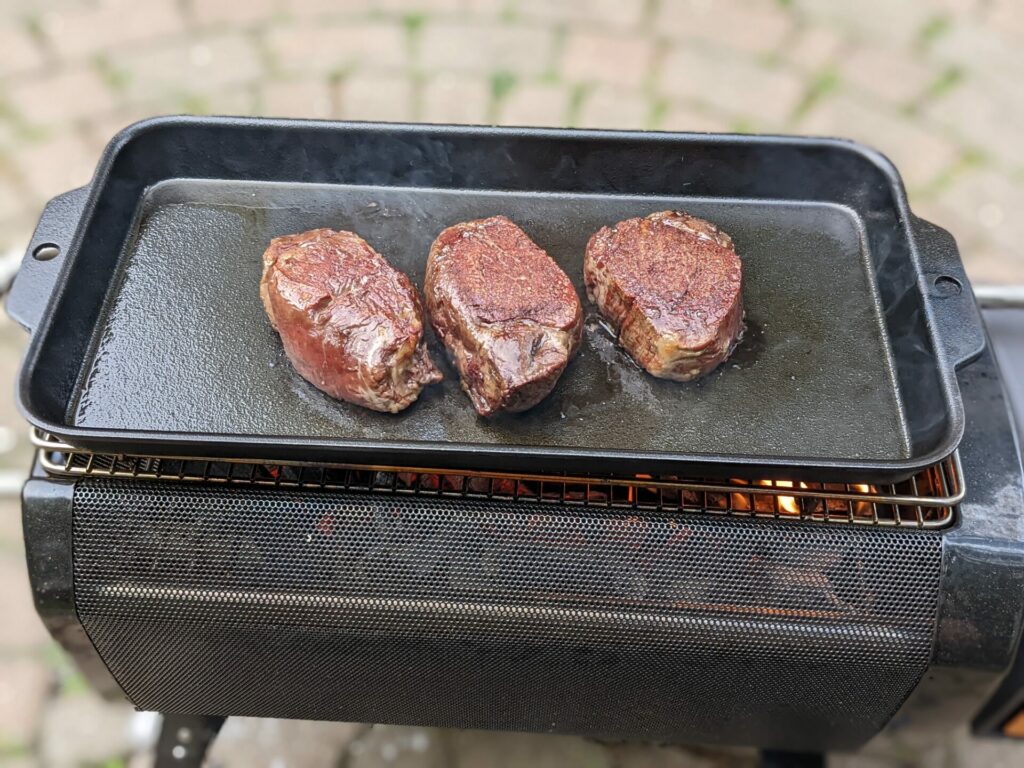
Using the Griddle and Searing
When using the griddle, you’ll want to put the charcoal rack in the top position for high heat cooking. In the example of searing the filets at the end of indirect cooking, that also means adding more charcoal and spreading it across the whole grate.
While we know BioLite probably didn’t plan on using the FirePit for cooking like this, it’s worth noting the clearance is a little tight to put the rack on the top position. It’s not a big deal when the grill is cold, but on the side away from the battery pack it took a little bit of effort to move it up when loaded with hot charcoal. Be extra careful when you’re doing this!
Once the charcoal rack is in the top position and loaded with charcoal, slide the grill closed and put the griddle on top. It will take a fair amount of charcoal and a little time to heat up the griddle. Keep in mind you just added a thick piece of cold cast iron to the grill, so it will take quite a bit of heat energy to warm up.
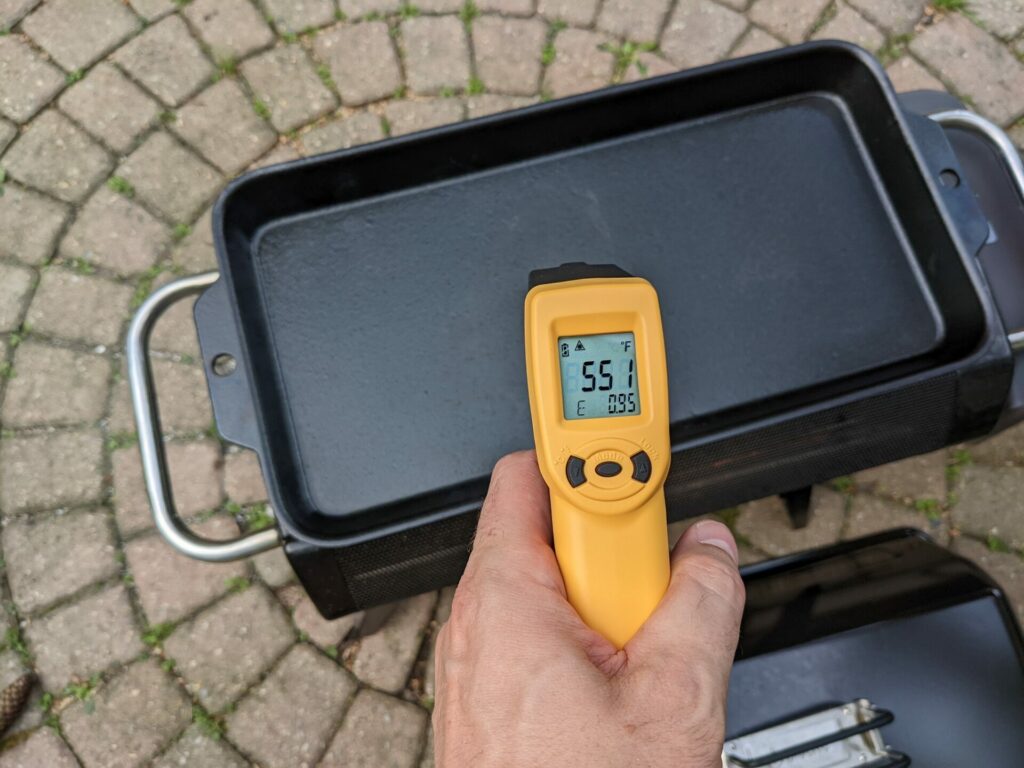
We used a ThermoWorks Industrial IR Gun to check the temperature of the griddle to know when it was ready to sear. If you’re cooking breakfast or something that doesn’t need really high temperatures, you’re ready to cook on the griddle. If you’re searing, you want the griddle to get really hot (above 500 degrees F). The air jets make this much quicker and easier. Just feed more air in and the charcoal and griddle will be hot pretty quick.
Conclusion
Are you going to want to cook on a fire pit with heat zones, sensors and different cooking methods all the time? No! The point is that with the BioLite FirePit+ you can do that, which is where other fire pits fall short. Most fire pits restrict you to cooking a high, direct heat. That’s what makes the FirePit not only a great fire pit, but also probably the best fire pit grill out there.